Introduction to Homemade Cake Pops
If you’re a young professional navigating the whirlwind of work-life balance, you know how vital it is to treat yourself every once in a while. Enter homemade cake pops: the perfect blend of indulgence and convenience. Whether you’re grabbing a quick snack during your busy day or looking for a fun dessert to impress friends at your next gathering, cake pops can meet your needs in style.
Why Homemade Cake Pops Are a Must-Try
You might be wondering, “What makes homemade cake pops so special?” Here are a few reasons:
- Quick and Easy to Make: With just a few ingredients, you can whip up a batch of cake pops in no time. Perfect for those unexpected sweet cravings!
- Customizable: Whether you love vanilla, chocolate, or something a bit more exotic like red velvet, you can tailor your cake pops to fit your taste. Not to mention, think of the endless decoration possibilities— sprinkles, chocolate drizzle, or even personalized designs.
- Portable Treats: If you’re constantly on the go, cake pops are the ultimate grab-and-go snack. Toss them in your bag for a quick energy boost during meetings or while running errands.
Another fantastic aspect of homemade cake pops is that they bring a delightful DIY element. Being hands-on can be a refreshing break from the monotony of office work. Sharing your creations with coworkers or friends can spark conversations and even lead to a mini potluck at work!
A Sweet Escape for Busy Lives
Research shows that indulging in sweet treats can actually increase your happiness and motivation levels (you can read more about this here). By taking just a bit of time to create your own sweet snacks, you’re not only treating your taste buds but also giving your mind a brief escape from daily pressures.
In the upcoming sections, we’ll dive into step-by-step instructions for making these homemade cake pops. You won’t want to miss it—this is a treat you’ll want to make again and again!
Ingredients for Homemade Cake Pops
Essential ingredients for delicious cake pops
Creating irresistibly delicious homemade cake pops begins with a few staple ingredients that are easy to gather. Here’s what you need:
- Cake: You can use any flavor you like; a box mix or homemade cake works great!
- Frosting: A small amount binds the cake and adds moisture. Pick your favorite flavor.
- Candy melts or chocolate: Perfect for coating your pops, choose classic chocolate, vanilla, or fun colors for extra pizzazz.
- Lollipop sticks: Essential for easy handling and eating! You can find these at most craft stores.
Optional ingredients for customization
Want to make your homemade cake pops truly unique? Consider adding some optional ingredients:
- Sprinkles or edible glitter: Add a touch of flair with colorful toppings.
- Flavor extracts: Enhance the taste with vanilla, almond, or mint extracts.
- Nuts or crushed cookies: For a crunchy texture, sprinkle some on top or mix into the cake.
These additions allow you to get creative and personalize your cake pops, making them perfect for any occasion! For more baking tips, check out this guide on cake decorating. Happy baking!
Step-by-Step Preparation of Homemade Cake Pops
Creating homemade cake pops is a fun project that allows you to unleash your creativity and enjoy delicious treats! Follow these detailed steps to make cake pops that are not only visually appealing but also packed with flavor.
Prepare Your Oven and Cake Pan
First things first, let’s preheat your oven to 350°F (175°C). This will ensure it’s nice and hot by the time your cake batter is ready. While the oven heats up, take a 9×13 inch cake pan and grease it with a little butter or non-stick spray. You can also line the bottom with parchment paper for easier removal later. Having everything set up from the beginning makes the baking process smoother and more enjoyable!
Make the Cake Batter
Now for the fun part: making the cake batter! You can opt for a classic vanilla, chocolate, or any flavor you love. Here’s a simple recipe you can follow:
- 1 ¾ cups all-purpose flour
- 1 ½ cups sugar
- ½ cup unsweetened cocoa powder (for chocolate)
- 1 cup buttermilk
- ½ cup vegetable oil
- 3 large eggs
- 2 teaspoons baking powder
- 1 teaspoon vanilla extract
- A pinch of salt
In a large mixing bowl, combine the dry ingredients first, then add in the wet ingredients one by one. Mix well until the batter is smooth. Remember: over-mixing can lead to dense cake, and you want your cake pops to be light and fluffy.
Bake and Cool the Cake
Pour your cake batter into the prepared pan and bake it for about 30-35 minutes or until a toothpick inserted in the center comes out clean. This is the moment to create a delightful aroma in your kitchen! Once baked, allow the cake to cool completely in the pan for about 10 minutes and then transfer it to a wire rack to cool fully before moving on to the next step. Pro tip: Chilling the cake in the fridge for a bit can make crumbling easier!
Create the Frosting
While the cake cools, it’s time to whip up your frosting. You can use buttercream or cream cheese frosting, depending on your preference. Here’s a basic buttercream recipe to give you that perfect sweetness:
- ½ cup unsalted butter, softened
- 2 cups powdered sugar
- 1 teaspoon vanilla extract
- 1-2 tablespoons milk (to reach your desired consistency)
Combine these ingredients in a mixing bowl until smooth and fluffy. The frosting will help bind the cake together, adding great flavor to your homemade cake pops.
Crumble the Cake and Mix with Frosting
Once the cake is fully cooled, crumble it into a large bowl using your hands or a fork. The goal is to achieve a fine crumble, similar to sand. Gradually mix in your frosting until it reaches a dough-like consistency. You want it moist enough to hold its shape but not too sticky.
Scoop and Roll the Cake Pops
Next, grab a cookie scoop or tablespoon and start scooping out the cake mixture. Roll each scoop into a smooth ball between your palms. Aim for about 1 inch in diameter; this will create the perfect bite-sized pops! Place the rolled balls on a baking sheet lined with parchment paper, then chill them in the fridge for about 15-30 minutes to help them firm up.
Prepare Lollipop Sticks
While your cake balls chill, get your lollipop sticks ready. You can dip the ends of the sticks into some melted chocolate or frosting before inserting them into the cake balls. This will help secure them better and prevent them from falling off later.
Dip the Cake Pops
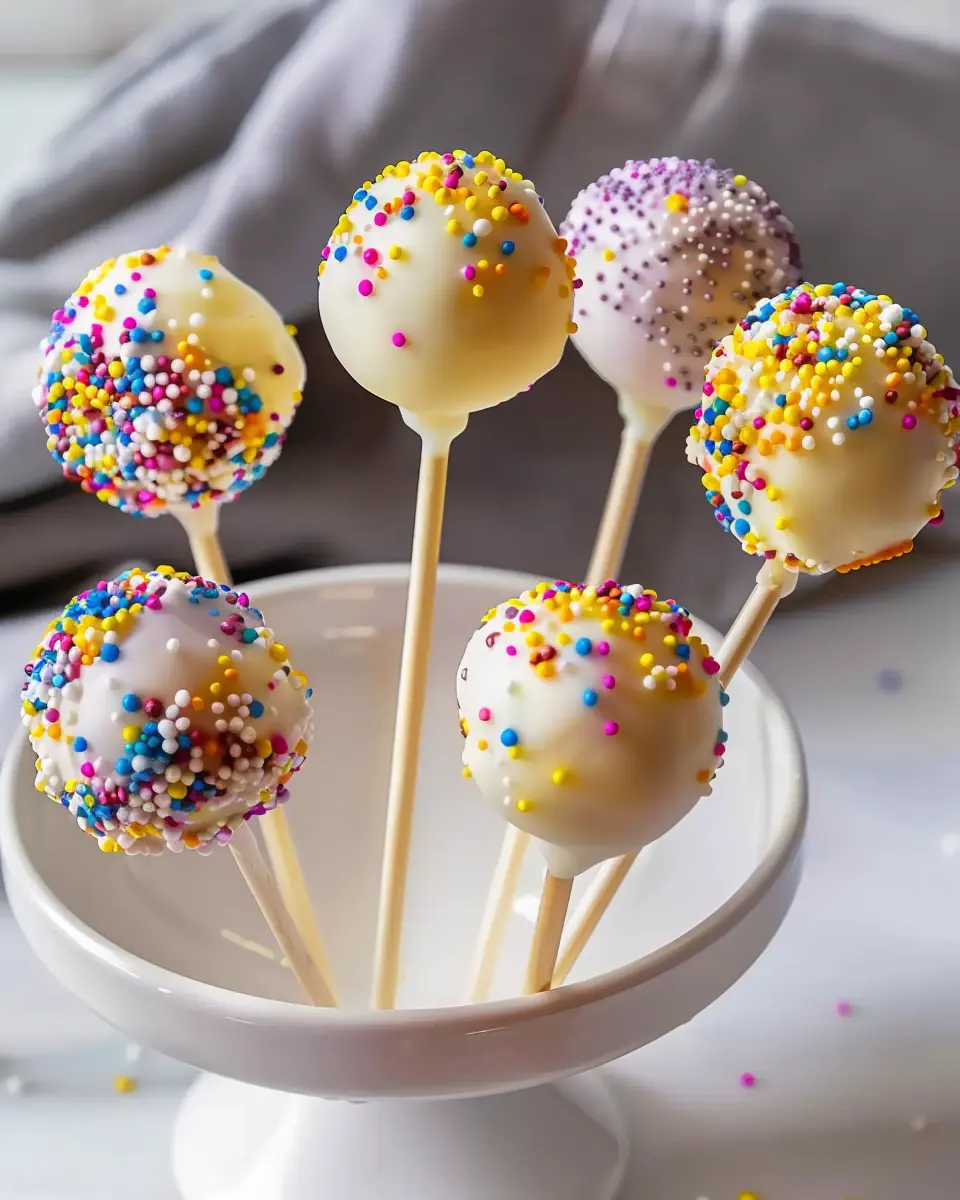
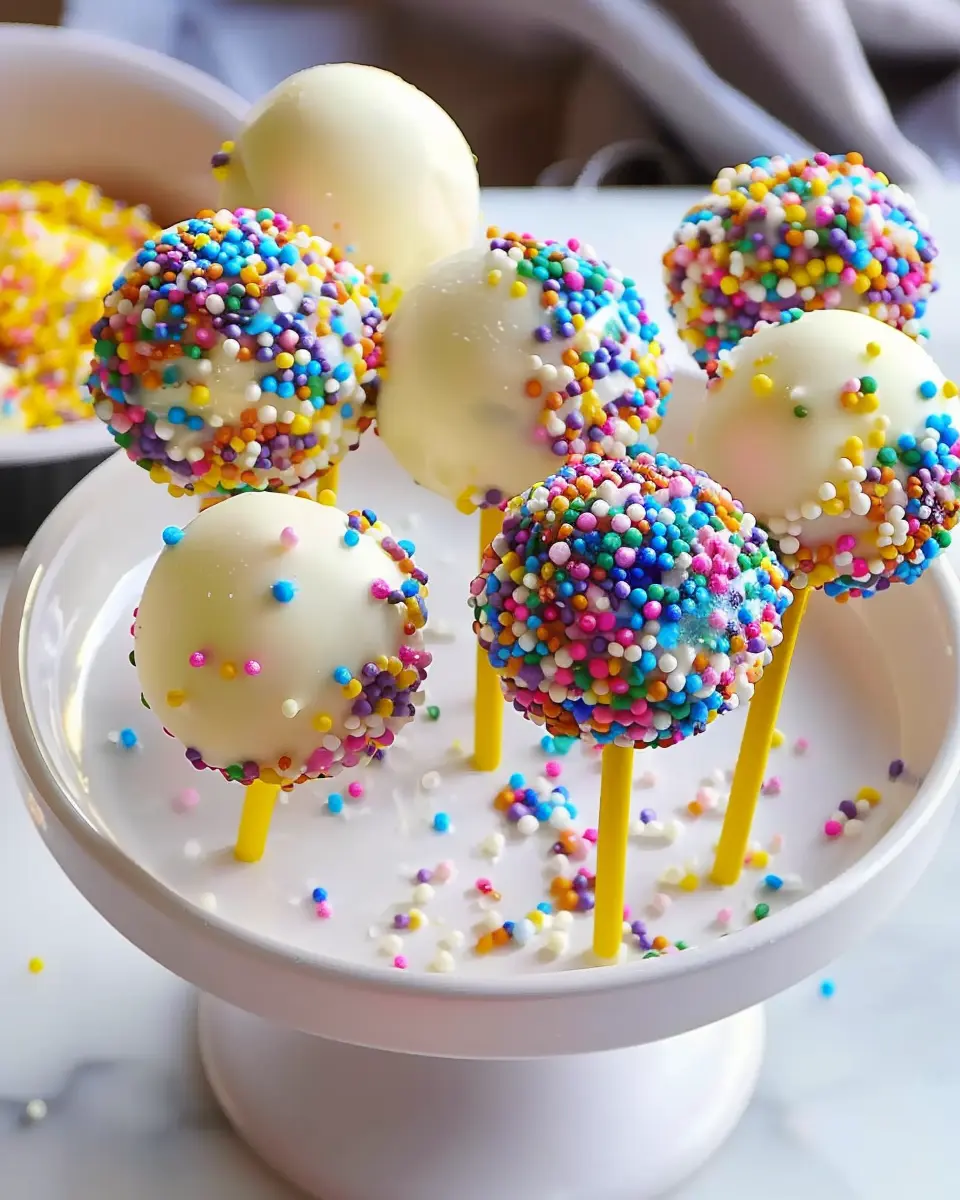
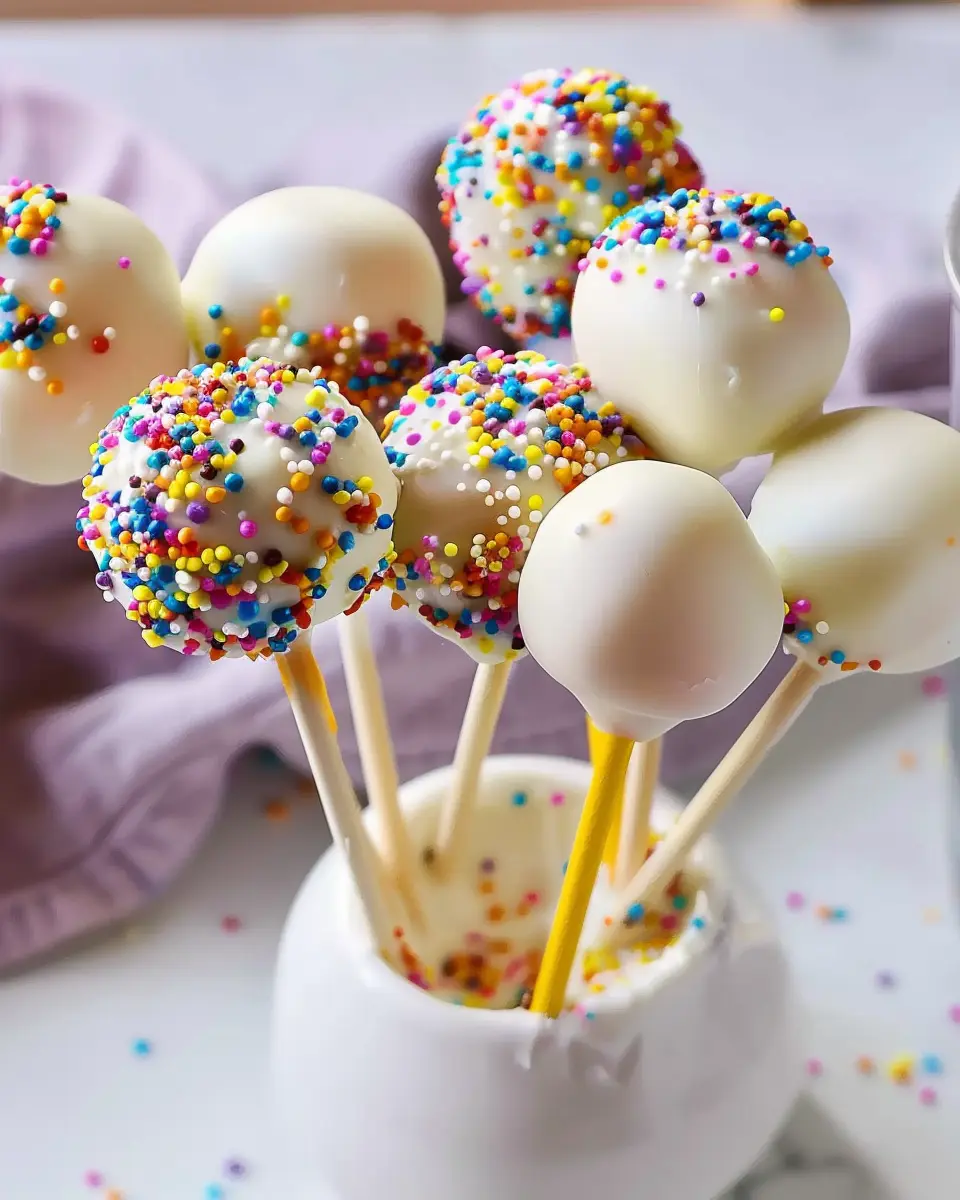
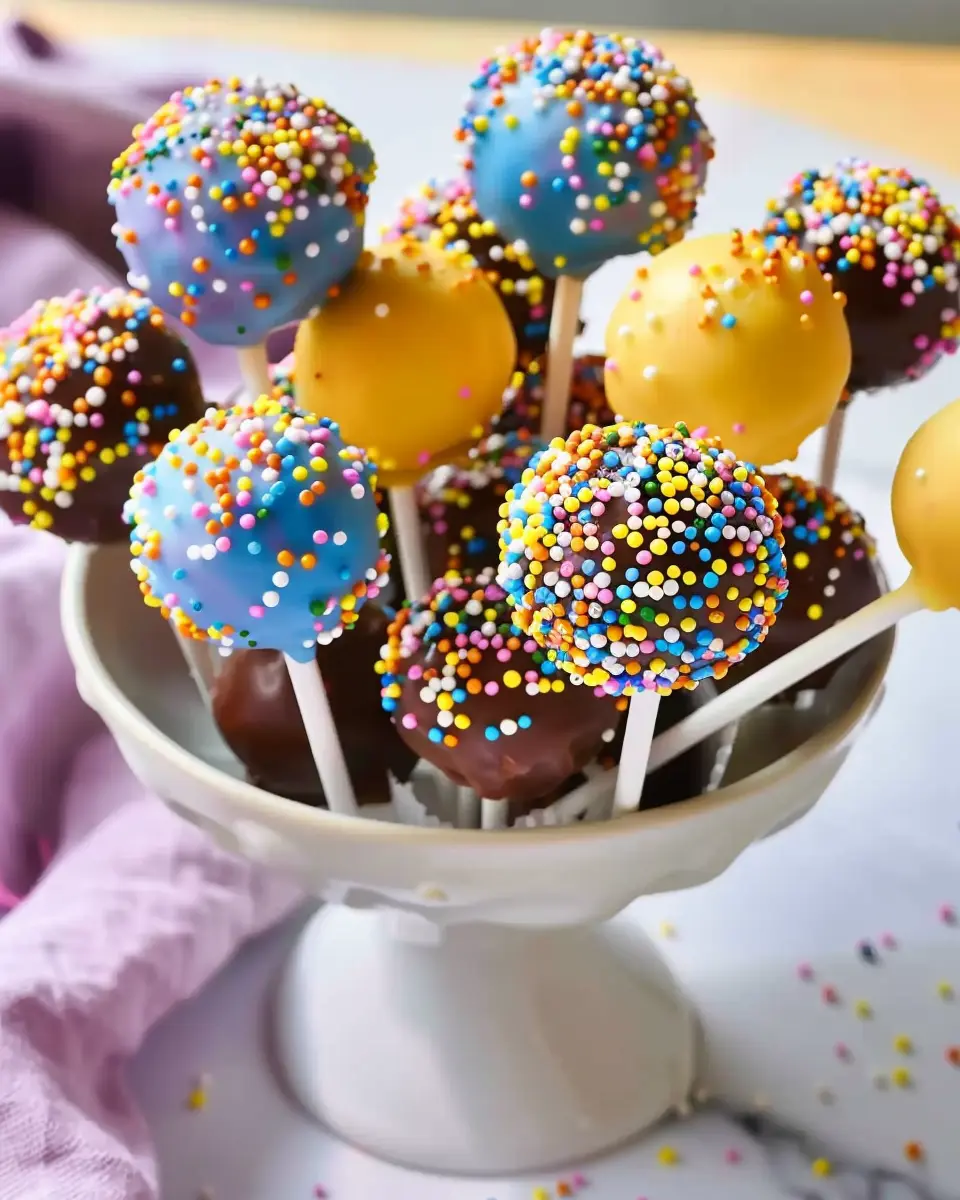
Finally, it’s time to dip your homemade cake pops! Melt some candy melts or chocolate in a microwave-safe bowl. Dip each pop into the melted coating, ensuring it is fully covered. Allow any excess chocolate to drip off. Before the coating hardens, you can sprinkle some colorful toppings, like sprinkles or crushed nuts, for that extra flair.
Let your cake pops set on a styrofoam block or a piece of cardboard until the chocolate is fully hard. This step adds a beautiful finishing touch to your delightful treats!
Wrapping Up
And there you go! With just a bit of time and creativity, you’ve made scrumptious homemade cake pops that are perfect for any occasion. Enjoy sharing them with friends, or keep them all to yourself! If you want to explore more sweet treats, check out Baker’s Joy for ideas and tips. Happy baking!
Variations on Homemade Cake Pops
Homemade cake pops offer endless opportunities for creativity. Depending on your taste preferences and dietary needs, here are some delightful variations to consider:
Indulgent Chocolate Cake Pops
For all the chocolate lovers seeking a rich, fudgy experience, chocolate cake pops are the way to go. Start by baking a moist chocolate cake—use your favorite recipe or try a boxed mix for convenience. Once cooled, crumble the cake and mix it with chocolate frosting until you achieve a moldable consistency. After forming balls, dip them in melted chocolate or candy coating for that perfect finishing touch. You can also sprinkle some chocolate shavings or sea salt on top for a gourmet twist. For a deeper dive into different chocolate varieties, check out this chocolate guide.
Decadent Red Velvet Cake Pops
Red velvet cake pops add a touch of elegance to any occasion. The striking red color combined with cream cheese frosting creates a visually stunning and delicious treat. Simply prepare your red velvet cake (another box mix or scratch recipe will do), crumble, and mix. As with chocolate cake pops, dip these in white chocolate to enhance their visual appeal. For a delicious garnish, consider using crushed nuts or festive sprinkles. If you’re interested in a bit more on the history of red velvet, you can find it on NPR’s food blog.
Gluten-Free Cake Pops
If you’re looking for a homemade cake pops variation that accommodates gluten-free diets, fear not! Many gluten-free cake mixes are on the market today. Simply substitute with your favorite blend, crumbling the finished cake and mixing it with gluten-free frosting. You can dip these pops in chocolate or sprinkle with gluten-free toppings. It’s a simple and delicious way to ensure everyone can savor your sweet creations!
So, whatever your preference, these cake pop variations have got you covered!
Cooking Tips and Notes for Homemade Cake Pops
Common pitfalls to avoid
When making homemade cake pops, one of the most common mistakes is over-crumbing your cake. You want a fine crumb, but if it’s too moist, your pops might not hold their shape. A good rule of thumb is to crumble the cake just until it resembles sand. Also, don’t skip letting the cake pops chill before dipping; this step is crucial for achieving that smooth, professional finish.
Make sure you use quality chocolate or candy coating—look for high-fat content options for better melting and coating. For a helpful guide on choosing chocolate, check out Serious Eats.
Storage tips for leftovers
If you find yourself with leftover homemade cake pops, store them in an airtight container at room temperature for 1-2 days. For longer storage, pop them in the fridge where they can last up to a week. Just remember to separate layers with parchment paper to avoid sticking. If you want to extend their shelf life even further, freeze them for up to three months! Just ensure they’re fully wrapped to maintain their deliciousness.
Nothing beats the joy of sharing your cake pops with friends, but if some do linger, these tips will keep them fresh and tasty!
Serving Suggestions for Homemade Cake Pops
Elevate your homemade cake pops from simple treats to a delightful centerpiece with these serving suggestions!
Fun Ways to Display Cake Pops
Presentation is key, and displaying your cake pops can be incredibly fun! Here are a few creative ideas:
- Decorative Stand: Arrange your pops on a cupcake stand or a tiered platter for a lovely visual impact.
- Themed Containers: Use mason jars filled with rice or beans to hold the pops upright, customizing the jar for parties or holidays.
- Color Coordination: Match your pops’ colors to your event’s theme for a cohesive look, whether it’s pastel for a spring gathering or vibrant for a birthday bash.
Pairings with Beverages
Pairing your homemade cake pops with delightful beverages can enhance the tasting experience. Consider:
- Coffee: A rich espresso or creamy latte pairs beautifully with chocolate or mocha cake pops.
- Tea: Herbal or fruit teas complement vanilla or lemon pops perfectly, offering a refreshing balance.
- Milkshakes: For a fun twist, serve pops with a thick milkshake. The combination is sure to delight both kids and adults!
For more ideas on entertaining and pairing drinks, check out resources from the American Beverage Association. Your cake pops will not only be delicious but also impressively presented!
Time Breakdown for Homemade Cake Pops
Preparation Time
Getting started on your homemade cake pops is quick and fun. The preparation usually takes around 30 minutes, which includes gathering your ingredients, mixing your cake batter, and cooling it before crumbling.
Baking Time
Once your batter is ready, pop it into the oven and let it bake for about 25 to 30 minutes. Keep an eye on it; a toothpick should come out clean when it’s done. Remember, perfect timing can make a world of difference!
Total Time
From preparation to the final decorative touches, you’re looking at a total time of about 1.5 to 2 hours. Sure, it sounds like a commitment, but trust me, the delightful payoff is well worth it! If you’re interested in making other sweet treats, check out this guide to delicious desserts.
Nutritional Facts for Homemade Cake Pops
When enjoying homemade cake pops, it’s good to be aware of their nutritional profile. Here’s a quick breakdown to satisfy your curiosity.
Calories per cake pop
On average, each cake pop contains about 120-150 calories. This can vary based on your ingredients, like whether you choose a rich frosting or a lighter coating. So, you can treat yourself without worry!
Protein content
Each homemade cake pop typically has around 2-3 grams of protein. While they’re not protein powerhouses, they do offer a little boost, especially when made with cake mixes that include eggs.
Sugar content
Expect about 10-15 grams of sugar per cake pop. Given the sweetness of cake pops, it’s wise to enjoy them in moderation. For a slightly healthier alternative, consider using a sugar-free chocolate coating or reducing the icing.
For more insights on baking and healthy eating, check out Harvard Health and Verywell Fit for guidance.
FAQs about Homemade Cake Pops
Can I use a cake mix for cake pops?
Absolutely! Using a cake mix can simplify your baking process, making it quicker and easier to whip up delicious homemade cake pops. Just follow the instructions on the box to prepare the cake, then crumble it to mix with frosting. This method not only saves time but also ensures that you still get the lovely flavors and textures you want in your cake pops. If you’re curious about the differences between homemade and store-bought mixes, check out this baking guide for more insights.
How do I store leftover cake pops?
Proper storage is key to keeping your homemade cake pops fresh. Here’s how:
- Room Temperature: If you plan to enjoy them within a few days, simply keep them in an airtight container at room temperature.
- Refrigeration: For longer storage, place them in the fridge. Just ensure they’re wrapped or stored in a container to prevent them from drying out.
- Freezing: If you have excess cake pops, freezing them is an excellent option! Place them in a freezer-safe container, and they can last for up to three months. Just remember to thaw them in the fridge overnight before serving.
What can I use instead of candy melts?
While candy melts are a popular choice for coating cake pops, there are plenty of alternatives. You could use:
- Chocolate Chips: Melt dark, milk, or white chocolate chips for a rich flavor.
- Coating Chocolate: This option can give you a shiny finish similar to candy melts.
- Yogurt Coating: For a lighter, tangy twist, try using yogurt melts for a unique flavor experience.
These substitutes can add variety and depth to your homemade cake pops. Got any other questions? Don’t hesitate to ask!
Conclusion on Homemade Cake Pops
Why you’ll love making cake pops at home
Homemade cake pops are not just a fun treat; they offer endless creativity! You can tailor flavors and decorations to suit any occasion, making them perfect for parties or simply enjoying at home. What’s more, the satisfaction of creating these delightful bites from scratch can’t be beat. Imagine biting into a rich chocolate cake pop, every bit a treat of joy.
Plus, homemade cake pops save money compared to store-bought versions. It’s a win-win! For anyone looking to add a personal touch to their desserts, making your own cake pops can be an enjoyable and rewarding experience. So roll up your sleeves, grab the sprinkles, and let your culinary adventure begin! For some inspiration, check out these creative cake pop ideas.
PrintHomemade Cake Pops: Easy and Indulgent Treats for Everyone

Indulge in the delightful world of homemade cake pops! Perfect for parties and gatherings, these treats are easy to make and irresistibly delicious.
- Prep Time: 30 minutes
- Cook Time: 0 minutes
- Total Time: 1 hour
- Yield: 20 cake pops 1x
- Category: Desserts
- Method: Baking
- Cuisine: American
Ingredients
- 1 cake (your choice of flavor)
- 1 cup frosting
- chocolate coating (as needed)
- sprinkles (for decoration)
- 10 lollipop sticks
Instructions
- Crumb the cake into a large bowl.
- Add frosting to the crumbs and mix until combined.
- Form the mixture into small balls and place on a baking sheet.
- Chill in the refrigerator for 30 minutes.
- Dip the tip of each lollipop stick into the chocolate coating and insert it into each ball.
- Coat the cake pops in chocolate and sprinkle with decorations.
- Let them set before serving.
Notes
- Experiment with different flavors of cake and frosting for variety.
- Use white chocolate or colored candy melts for a fun twist.
Nutrition
- Serving Size: 1 cake pop
- Calories: 150
- Sugar: 10g
- Sodium: 50mg
- Fat: 7g
- Saturated Fat: 4g
- Unsaturated Fat: 2g
- Trans Fat: 0g
- Carbohydrates: 20g
- Fiber: 1g
- Protein: 2g
- Cholesterol: 10mg
Keywords: Homemade Cake Pops