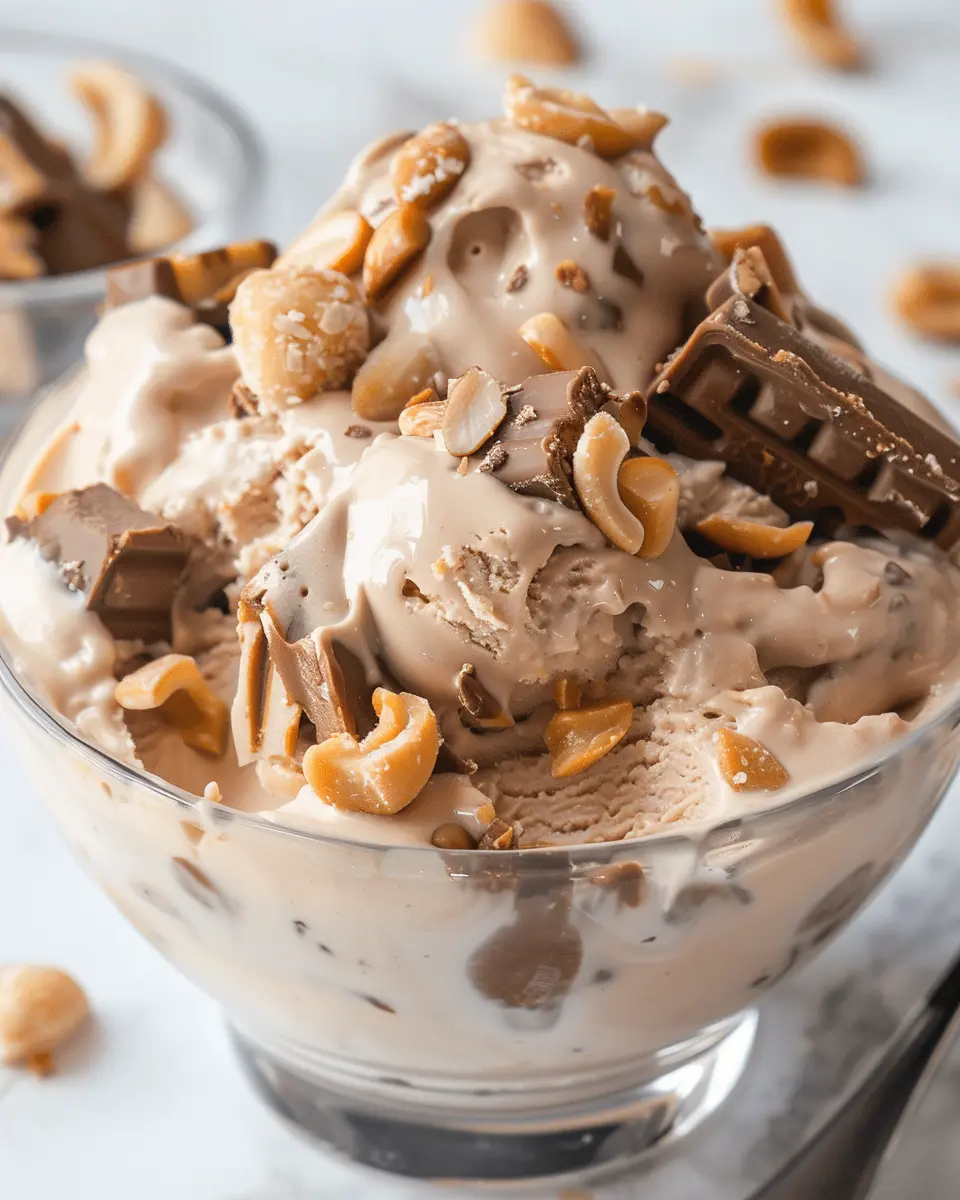
Introduction to Ninja Creami Dairy Queen Snickers Blizzard
If you’re like many of us, the Dairy Queen Snickers Blizzard evokes fond memories of hot summer days or cozy evenings with friends. But why rely on a trip to the fast-food chain when you can whip up your very own Ninja Creami Dairy Queen Snickers Blizzard right at home? Making this delicious treat is easier than you think, and it allows for some delightful experimentation.
Why make a Snickers Blizzard at home?
Creating your own Ninja Creami Dairy Queen Snickers Blizzard can be a rewarding and fun experience. Here are just a few reasons why you might want to try it:
-
Customization: When you make it at home, you have control over the ingredients. Want extra chocolate? Go for it! Prefer a lighter treat? Adjust the amounts of ice cream or toppings to suit your taste.
-
Healthier Options: If you’re looking to cut back on sugar or calories, you can choose your ice cream and mix-ins wisely. For instance, using reduced-fat ice cream or even frozen yogurt can lighten the load without sacrificing flavor.
-
Cost-effectiveness: Frequent visits to Dairy Queen can add up. By making a Snickers Blizzard at home, you can enjoy multiple servings at a fraction of the price. Plus, you might just find it’s more satisfying when shared with friends at a backyard BBQ or movie night.
-
Fun in the Kitchen: Cooking and preparing treats can be a great way to unwind. Combine ingredients, mix flavors, and serve it up. It’s not just about the end result but also the joy of making something delicious yourself.
So, are you ready to embark on this culinary adventure? Not only will you bake to your heart’s content, but you’ll also impress anyone who gets to indulge in your homemade Ninja Creami Dairy Queen Snickers Blizzard.
Getting Inspired
Ready to learn how to make this beloved treat? Let’s dive into the recipe that will turn your kitchen into a mini ice cream parlor. You might not only save money but also create wonderful memories doing so! Don’t forget to check out this Ninja Creami review to see how versatile this machine can be.
Ingredients for Ninja Creami Dairy Queen Snickers Blizzard
Crafting a Ninja Creami Dairy Queen Snickers Blizzard at home is not only a delightful experience but also a chance to impress your friends with your culinary skills. Let’s dive into the necessary ingredients to whip up this indulgent treat!
Ice Cream Base Ingredients
To get that creamy and smooth consistency that mimics the classic Blizzard, you’ll need:
- 2 cups of whole milk or heavy cream
- 1 cup of sweetened condensed milk
- 1 teaspoon of vanilla extract
- A pinch of salt
This luscious base is what makes the Ninja Creami Dairy Queen Snickers Blizzard truly shine!
Mix-ins Ingredients
Now for the fun part! Here’s what you’ll need for that Snickers-like crunch and caramel flavor:
- 1 cup of crushed Snickers bars (about 3-4 bars)
- 1/4 cup of chocolate syrup
- 1/4 cup of caramel sauce
- Optional: chopped peanuts for extra crunch
Make sure to check out some Snickers trivia on Snickers’ official website to enrich your knowledge while you enjoy this treat! Have you ever thought about how the combination of chocolate, nougat, and caramel would elevate your dessert game? It’s magical!
Step-by-step preparation of Ninja Creami Dairy Queen Snickers Blizzard
Making a Ninja Creami Dairy Queen Snickers Blizzard at home doesn’t just bring a delicious icy treat to your kitchen; it also saves you a trip to the drive-thru! If you’ve been dreaming of that perfect blend of creamy, nutty, and chocolatey goodness, you’re in for a treat. Here’s how you can create this delightful dessert in your very own Ninja Creami!
Prepare the ice cream base
The heart of this delicious blizzard is its creamy ice cream base. Start by gathering your ingredients:
- 2 cups heavy cream
- 1 cup sweetened condensed milk
- 1 teaspoon vanilla extract
- 1/4 cup chocolate syrup (optional for extra richness)
In a large mixing bowl, combine the heavy cream, sweetened condensed milk, vanilla extract, and chocolate syrup. Stir gently until the mixture is smooth and fully blended. This part is key; the quality of your base will determine the creaminess of your final product. Once combined, you should have a luscious mixture that looks almost good enough to eat as is!
Freeze the mixture
Now that you’ve prepared your ice cream base, it’s time to freeze it. This step is crucial for achieving that thick, swirling consistency you love in a Dairy Queen Snickers Blizzard. Pour the mixture into a freezer-safe container, seal it tightly, and place it in the freezer for about 6-8 hours or until fully solid. For best results, let it freeze overnight—this way, when you scoop it out, it will be perfectly firm but not rock-hard.
Process in the Ninja Creami
Once your ice cream base is frozen, it’s time to unleash the power of the Ninja Creami! Remove your frozen ice cream from the freezer and let it sit for about 10 minutes to soften slightly; this makes blending easier. Then, remove the lid, and load it into the Ninja Creami’s processing bowl. Select the “ice cream” function to blend until the base is creamy and smooth, which should take about 2 minutes.
Remember, if you want that classic blizzard texture, you might even consider pulsing it a little longer. If you’re new to using this nifty machine, feel free to check out the Ninja website for some tips on usage!
Add mix-ins
This is where the fun really begins! To replicate the Snickers flavor profile perfectly, chop up some Snickers bars into bite-sized pieces. You’ll want about one cup of these delicious nuggets. Once the base is smoothly processed, add the Snickers pieces straight into the bowl. You can also toss in some crushed peanuts for added crunch or drizzle some caramel for a decadent finish. Stir gently to incorporate the mix-ins evenly throughout your creamy delight.
Final touches and re-spin if needed
After adding your mix-ins, you’re almost there! If you find that your mixture has stiffened up a bit more than you’d like, you can always do a “re-spin.” Place the mix back into the Ninja Creami, select the “re-spin” function, and let it process again until you reach your desired consistency.
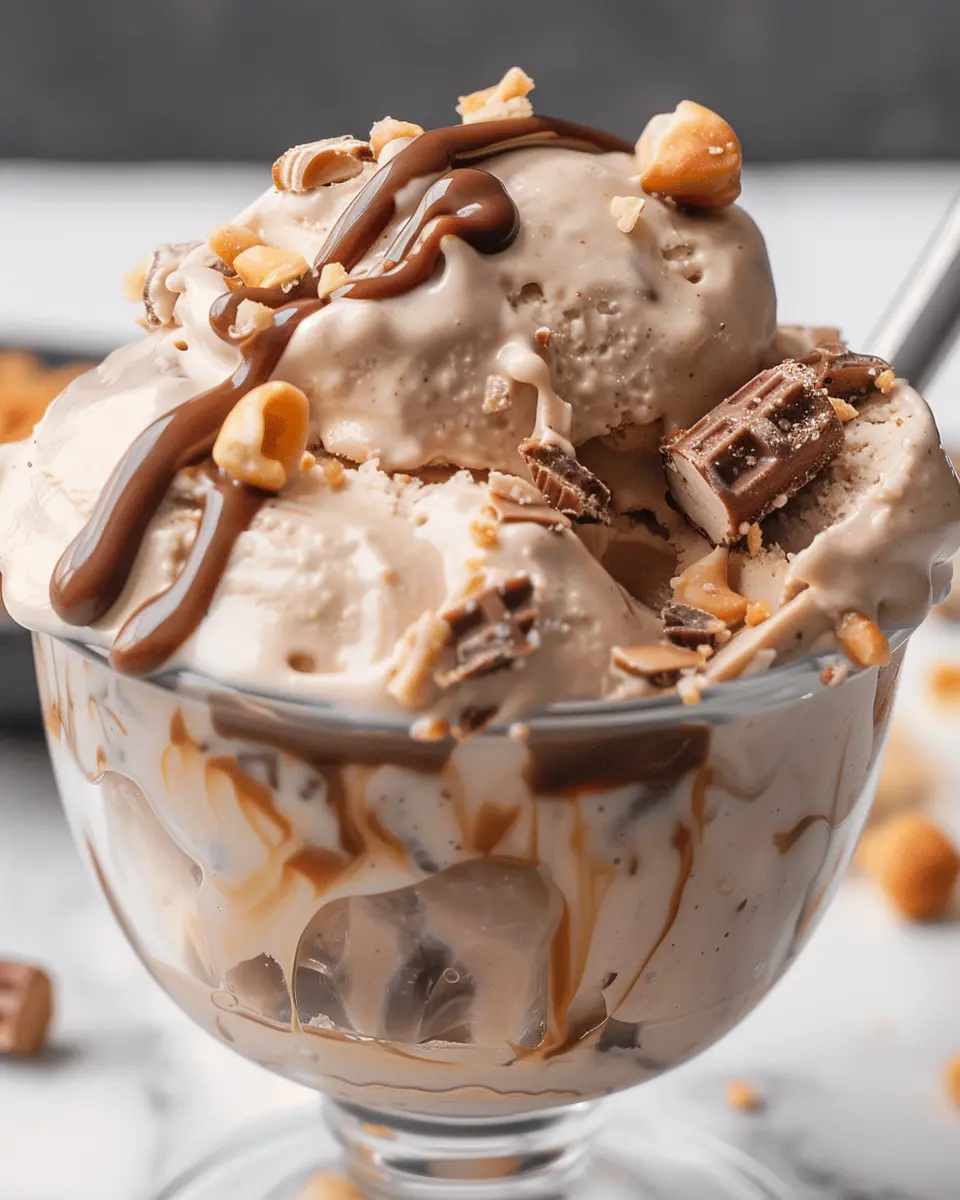
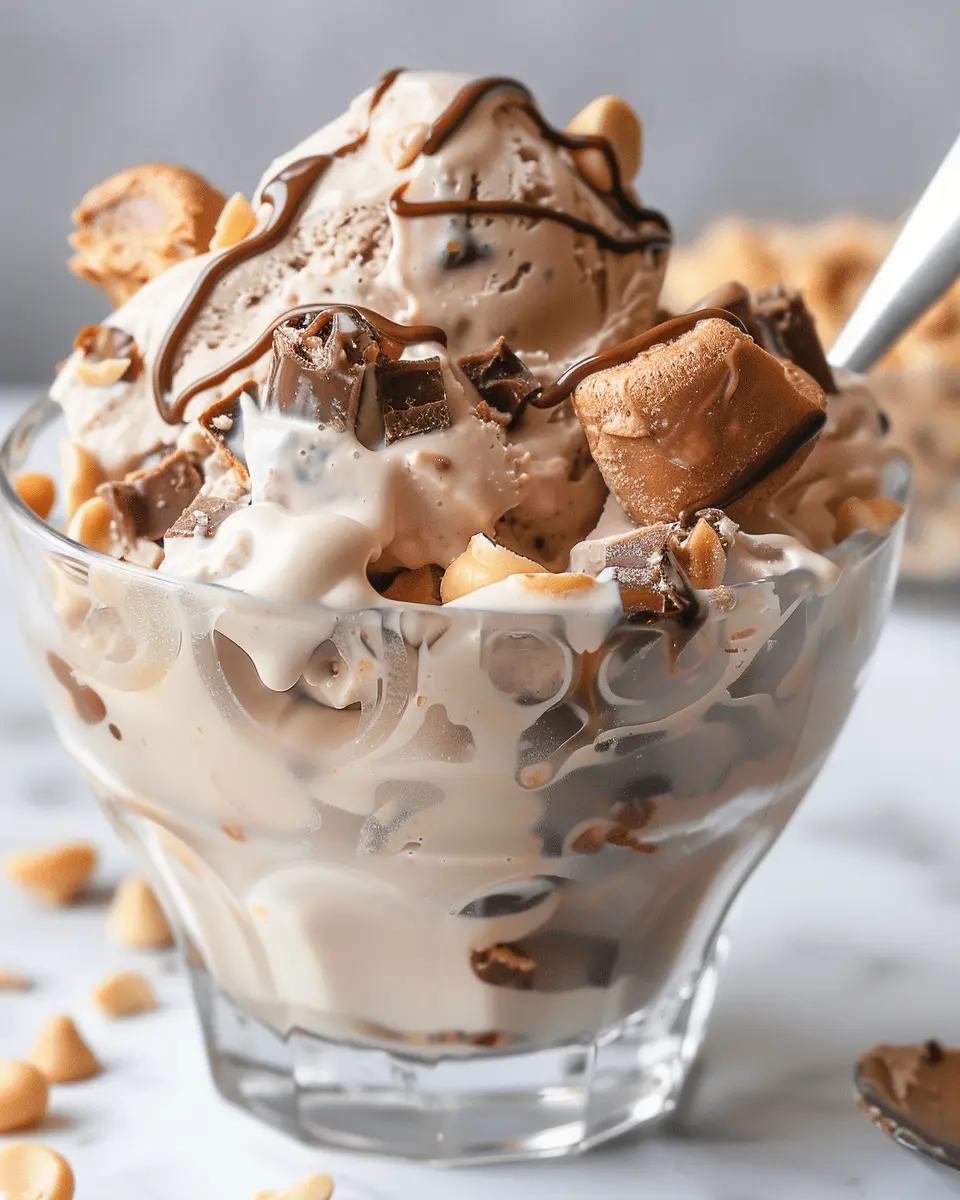
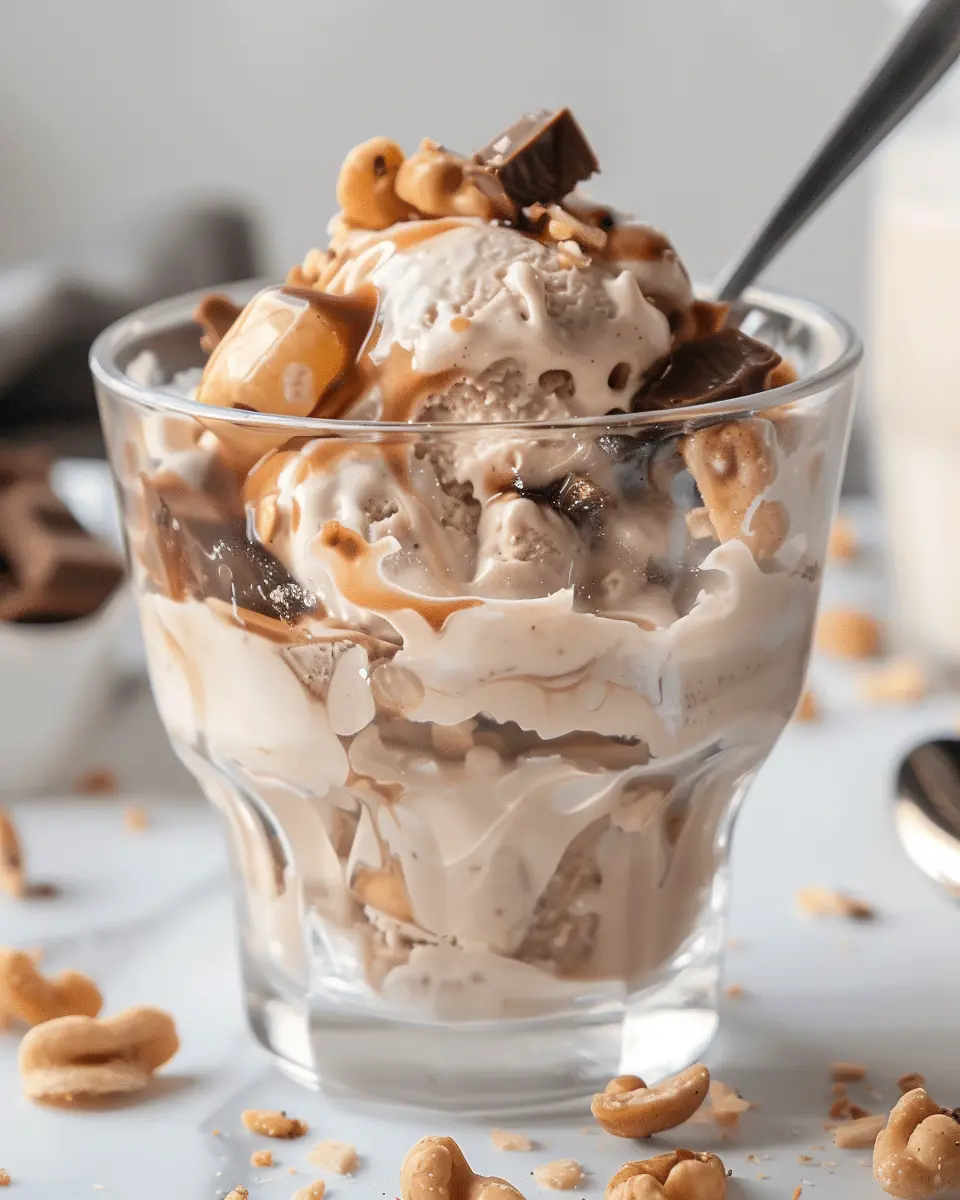
Once it’s all blended perfectly, it’s time to scoop and serve! You can also top your Ninja Creami Dairy Queen Snickers Blizzard with whipped cream, additional chocolate syrup, or crushed nuts for that authentic finishing touch.
Enjoy your homemade treat and bask in the glory of having made something so indulgent all by yourself. If you find yourself loving this recipe, explore other frozen desserts that you can make with your Ninja machine. The possibilities are endless!
Variations on Ninja Creami Dairy Queen Snickers Blizzard
When you’re craving a cool treat, the Ninja Creami Dairy Queen Snickers Blizzard is a fantastic choice. However, the fun doesn’t have to stop with the traditional recipe. Here are some tasty variations to shake things up!
Delicious Candy Mix-Ins
While Snickers are undeniably delicious, consider experimenting with different candy bars or mix-ins to create your own unique blizzard. Popular options include:
- Twix: The caramel and cookie crunch brings a delightful texture.
- Reese’s Peanut Butter Cups: Add a nutty, chocolatey twist that blends perfectly with the ice cream.
- M&M’s: Bright, colorful, and fun, they add a cheerful crunch.
Feeling adventurous? Try combining a few of these candies for a Blizzard Mash-Up! You never know, you might just discover your new favorite flavor!
Dairy-Free Alternatives
For those seeking a healthier or dairy-free option, don’t worry—it’s easy to adapt the Ninja Creami Dairy Queen Snickers Blizzard. Here’s how:
- Plant-Based Ice Cream: Brands like So Delicious or Almond Dream offer great dairy-free ice creams that mimic the creaminess of traditional ice cream.
- Coconut Milk: For a rich texture, use full-fat coconut milk. It lends a creamy consistency while keeping things dairy-free.
- Nut Milk: Almond or cashew milk can work as base alternatives, though they may need a bit of additional thickener, like coconut cream, for that blizzard-like consistency.
These alternatives not only cater to dietary preferences but can also open up your palate to new flavors. With just a little creativity, you can whip up a deliciously satisfying version of a Ninja Creami Dairy Queen Snickers Blizzard that’s tailored to your taste!
Looking for more ideas and recipes to inspire your creations? Check out well-loved resources like Serious Eats or Food Network for endless culinary creativity!
Helpful tips for Ninja Creami Dairy Queen Snickers Blizzard
Troubleshooting mix texture
Achieving the perfect texture for your Ninja Creami Dairy Queen Snickers Blizzard is key to elevating your homemade treat. If your mix turns out too icy or grainy, here are a few things you can try:
- Blend for Longer: Ensure you blend your base mixture until it’s fully smooth; this reduces ice crystals.
- Adjust Liquid Levels: Sometimes, adding a touch more milk helps create a creamier consistency.
- Chill Properly: Always allow the mixture to freeze for the recommended time in your Ninja Creami. If it seems too firm, let it soften for a few minutes before making your Blizzard.
Choosing the right mix-ins
When it comes to creating your Ninja Creami Dairy Queen Snickers Blizzard, selecting the ideal mix-ins can take your dessert to the next level. Here are a few suggestions to enhance flavor and texture:
- Snickers Bars: The star of the show! Chop them into bite-sized pieces for even distribution.
- Chocolate Syrup: Drizzle it in while blending for an extra layer of rich flavor.
- Peanut Butter: A spoonful can enhance the indulgence and pair beautifully with the other ingredients.
Don’t hesitate to experiment with other textures and flavors! You might discover your new favorite combination. For more tips on creating delicious ice cream desserts, check out resources from The Ice Cream Journal. Remember, the joy of making your own Ninja Creami Dairy Queen Snickers Blizzard is all about personalizing the experience!
Serving suggestions for Ninja Creami Dairy Queen Snickers Blizzard
Perfect pairings with desserts
When indulging in a delightful Ninja Creami Dairy Queen Snickers Blizzard, why not enhance the experience with complementary desserts? Consider serving it alongside warm, fresh-baked cookies—think chocolate chip or peanut butter, which highlight the rich flavors of the Blizzard. A slice of fudgy brownie also works remarkably well; the contrasting textures elevate the treat to a whole new level.
For a touch of freshness, pair your Blizzard with a fruit salad. The sweetness of seasonal fruits like strawberries or bananas can balance out the creaminess of the Ninja Creami Dairy Queen Snickers Blizzard.
Creative serving ideas
Don’t be afraid to think outside the box! Serve your Ninja Creami Dairy Queen Snickers Blizzard in a waffle cone or a crispy pastry bowl for an extra fun twist. Consider adding toppings like crushed Snickers or a drizzle of caramel sauce for an upscale look and taste.
Want to make it a party favorite? Create a sundae bar at home! Offer various toppings, from whipped cream to nuts, allowing everyone to customize their own blizzard experience.
By getting creative and thoughtful with your pairings and presentations, you’ll turn your Ninja Creami Dairy Queen Snickers Blizzard into a memorable and delightful treat. Explore more options for fun dessert ideas here.
Time breakdown for Ninja Creami Dairy Queen Snickers Blizzard
Preparation time
Making the Ninja Creami Dairy Queen Snickers Blizzard is a breeze! You’ll spend approximately 10 to 15 minutes gathering ingredients and mixing to get that perfect base. Make sure to have your Snickers chopped up and ready to go — it makes the process even smoother.
Freezing time
The key to achieving that soft-serve consistency lies in the freezing phase. You’ll want to freeze your mixture for about 24 hours. This step is crucial for getting that creamy texture that mimics the real thing.
Total time
In total, plan for around 24 hours and 15 minutes to make your own delightful version of a Dairy Queen Snickers Blizzard. Keep in mind, though, that the freezing time is where the patience comes in, but trust me, it’s well worth the wait! If you want tips on turning this delectable treat into a dairy-free option, check out resources like Plant-Based on a Budget for helpful insights!
Nutritional facts for Ninja Creami Dairy Queen Snickers Blizzard
Calories per serving
When diving into a homemade Ninja Creami Dairy Queen Snickers Blizzard, it’s essential to know what you’re indulging in. Typically, one serving offers around 500 calories, making it a delightful treat for an occasional dessert craving.
Macronutrient breakdown
Curious about what fuels your sweet fix? Here’s a quick look at the macronutrient profile:
- Fat: Approximately 25g
- Carbohydrates: About 60g, delivering that satisfying sweetness
- Protein: Roughly 10g, giving you a bit of that creamy texture
Understanding these nutritional facts can help you enjoy your Ninja Creami Dairy Queen Snickers Blizzard with a bit more mindfulness. For more on the impact of sugar in your diet, check out the American Heart Association.
In crafting this recipe, you balance enjoyment and nutrition, making it an intriguing alternative to standard ice cream. Have you ever wondered how this compares to traditional ice cream treats? Engaging with such questions can deepen your appreciation for homemade versions!
Final thoughts
Now that you know the calorie count and macronutrient breakdown, you can savor your Ninja Creami Dairy Queen Snickers Blizzard with a little more knowledge! Enjoying treats doesn’t mean sacrificing health; it’s all about finding that sweet spot.
FAQs about Ninja Creami Dairy Queen Snickers Blizzard
Can I use a different ice cream maker?
Absolutely! While the Ninja Creami provides a unique texture and consistency perfect for your Dairy Queen Snickers Blizzard, you can use other ice cream makers if you have them. Just keep in mind that the final product might differ slightly. Machines like the Cuisinart Ice Cream Maker are popular alternatives that yield great results. Ensure you follow the instructions specific to your device for the best outcomes.
How long can I store the blizzard?
Storing your homemade Ninja Creami Dairy Queen Snickers Blizzard is straightforward. If kept in an airtight container in the freezer, it can last for about one to two weeks. However, for optimal taste and texture, it’s best enjoyed within a few days. After that, you may notice a change in creaminess and flavor. To revive a stored Blizzard, let it sit at room temperature for about 10 minutes before enjoying.
What’s the best way to customize my Blizzard?
Customization is part of the fun of making a Ninja Creami Dairy Queen Snickers Blizzard! Here are some easy ways to make it your own:
- Flavor Variations: Swap out vanilla ice cream for chocolate or even peanut butter ice cream.
- Texture Add-ins: Consider adding crushed pretzels or a swirl of caramel sauce for extra crunch and sweetness.
- Candy Choices: While Snickers are delicious, you can experiment with other candies like Reese’s or M&M’s.
For more creative ideas, check out this ice cream inspiration blog and unleash your inner flavor artist!
Conclusion on Ninja Creami Dairy Queen Snickers Blizzard
In wrapping up this delightful journey to recreate the Ninja Creami Dairy Queen Snickers Blizzard, you’re armed with a simple yet delicious recipe that brings joy to any occasion. Making this treat at home not only satisfies your sweet cravings but also allows you to tweak the ingredients to your liking. Whether you’re indulging solo or sharing, this homemade version will surely rival any store-bought blizzard.
So, why not try your hand at this creation? The combination of creamy ice cream, crunchy peanuts, and sweet caramel will bring a smile to your face. For more culinary inspirations, check out blogs like Serious Eats or Bon Appétit for delectable recipes! Enjoy your blizzard creation!
PrintNinja Creami Dairy Queen Snickers Blizzard Copycat Recipe: Indulgent Treat at Home
Create your own indulgent Snickers Blizzard at home with this Ninja Creami recipe.
- Prep Time: 10 minutes
- Cook Time: 0 minutes
- Total Time: 10 minutes
- Yield: 4 servings 1x
- Category: Dessert
- Method: blending
- Cuisine: American
- Diet: vegetarian
Ingredients
- 2 cups vanilla ice cream
- 1/2 cup milk
- 1/2 cup chopped Snickers bars
- 1/4 cup whipped cream
- 2 tablespoons chocolate syrup
Instructions
- In a blender, combine the vanilla ice cream and milk until smooth.
- Add chopped Snickers bars and mix until evenly distributed.
- Pour the mixture into the Ninja Creami container.
- Process according to the manufacturer’s instructions.
- Serve topped with whipped cream and drizzled with chocolate syrup.
Notes
- For a creamier texture, add more milk.
- Feel free to substitute Snickers with your favorite candy bars.
Nutrition
- Serving Size: 1 cup
- Calories: 350
- Sugar: 30g
- Sodium: 150mg
- Fat: 20g
- Saturated Fat: 10g
- Unsaturated Fat: 8g
- Trans Fat: 0g
- Carbohydrates: 40g
- Fiber: 1g
- Protein: 5g
- Cholesterol: 40mg
Keywords: Ninja Creami, Snickers Blizzard, Copycat Recipe, Dessert